Get Started with Grunt
Grunt has become an essential part of my workflow—like Sass, I never start a web project without it. Here’s an introduction to Grunt, its benefits and what it can do for you along with a guide to help you get started.
What is Grunt? Why should consider using it?
Think automation. Grunt is designed to speed up and automate repetitive, mundane tasks like compilation, concatenation, minification, testing, etc.
Grunt has saved me countless hours and headaches, has exponentially sped up my process, and has made my work much easier. If used rightly, it can do the same for you.
It also has an active community with a strong ecosystem that provides hundreds of plugins to automate just about anything you’d want.
What can you do with Grunt?
With hundreds of plugins, the choices are endless; however, here are a few tasks I rely on that you may find valuable.
Compile Sass/Less
Compile Sass or LESS, and also easily integrate mixin libraries like Bourbon or frameworks like Compass, Bootstrap, or Foundation.
Concatenate/Merge
Merge multiple JavaScript and/or CSS files together to minimize http calls and optimize your site.
In instances where it’s important that your files load in a specific, linear order, you can specify the order in which you want the files merged.
Detect JavaScript errors
Detect errors and even potential bugs or problems in your JavaScript so you can focus more on your code and less on things like typos and syntax errors.
Minify
Minify your CSS and JavaScript files, reducing file size and making them faster to download.
In development, I prefer to have my CSS and JavaScript fully expanded to make debugging easier, but I always minify my CSS and JavaScript before I deploy to production.
Here’s where Grunt really begins to shine…
Combine tasks with aliases
Run a set of tasks in a specific order (like a macro) with an “alias task.””
To prepare my site for deployment, I do the following:
- Clean temporary folders
- Compile Sass
- Minify CSS
- Concatenate JavaScript
- Uglify JavaScript
- Build Jekyll
With Grunt, I can run all 6 tasks with one command.
Watch for changes
Watch your files for any changes, and when a change has been detected, run a task or set of tasks.
For example, if there’s a file that’s a merge of 3 JavaScript files, Grunt can reconcatenate them automatically every time you save a change so you don’t have to do it manually.
Run multiple watch tasks concurrently
Run multiple watch tasks simultaneously with an alias task instead of having multiple Terminal windows open for each watch task.
Getting started
Now that you’re ready to get your hands dirty with Grunt, I’ll run you through the steps to install Grunt as well as a tour of its anatomy and some of the ins-and-outs.
Install Node.js
Download and install the latest version of Node.js at nodejs.org/download
Grunt is installed and managed by npm, Node.js’s package manager. npm is installed with Node.js so there’s no need to worry about that.
Install Grunt’s CLI (command line interface)
Run the following command in your command line.
npm install -g grunt-cli
You may have to run it with sudo if you’re getting errors.
Setting up a new project with Grunt
A typical Grunt project consists of two files: package.json and Gruntfile.js.
package.json- metadata for projects as well as listing Grunt and its necessary plugins your project needs.Gruntfile.js- configuration that loads and defines tasks.
package.json
There are multiple ways to create a package.json file, but for this guide we’ll be creating one manually.
Create and save your package.json file in the root directory of your project by using the following example:
{
  "name": "sample-project",
  "version": "0.0.1",
  "devDependencies": {
    "grunt": "~0.4.2",
    "grunt-contrib-concat": "^0.3.0",
    "grunt-contrib-uglify": "^0.4.0",
    "grunt-contrib-watch": "^0.6.1"
  }
}
Installing dependencies
In your command line, navigate to your project directory and run the following* :
npm install
This will install all of the required dependencies into your project. (Take notice that a node_modules directory was created)
* From here on out, assume that commands are to be run in your command line and in your project directory.
Adding a dependency
If you want to add another plugin, you can do it one of two ways:
Method #1
Replacing name-of-plugin with the appropriate plugin name, run this:
npm install name-of-plugin --save-dev
This will install the latest version of the plugin. The --save-dev flag will add the appropriate line to your package.json file.
Method #2
Add another line of json to your package.json file inside of devDependencies, like such:
  "devDependencies": {
    ...
    "grunt-contrib-concat": "^0.3.0",
    "name-of-plugin": "^x.x.x"
  }
Then run the following to install the plugin you added:
npm install
A quick note about setting the version of your dependency: A tilde ( ~ ) will match the most recent minor version, a caret ( ^ ) will match the most recent major version, and neither will lock the version down.
- ~1.2.3 will match the latest version of 1.2.x but skip anything >= 1.3.x.
- ^1.2.3 will match the latest version of 1.x.x but skip anything >= 2.x.x.
- 1.2.3 will only match 1.2.3 and skip anything else.
- latest will always install the latest version. (Be careful with this)
Grunfile.js
This is where you load your Grunt plugins, configure tasks, and set custom tasks. Create a Gruntfile.js file in the root directory of your project using this example:
module.exports = function(grunt) {
  grunt.initConfig({
    pkg: grunt.file.readJSON('package.json'),
    concat: {
      options: {
        banner: '/*! <%= pkg.name %> */',
      },
      dist: {
        src: ['js/file1.js', 'js/file2.js'],
        dest: 'js/build.js',
      }
    }
  });

  grunt.loadNpmTasks('grunt-contrib-concat');

  grunt.registerTask('default', ['concat']);
};
All of your Grunt code needs to be inside modules.export = function(grunt) {...};
Configuring tasks
Tasks are configured inside grunt.initConfig({...}); like such:
grunt.initConfig({
  pkg: grunt.file.readJSON('package.json'),
  concat: {
    options: {
      banner: '/*! <%= pkg.name %> */\n',
    },
    dist: {
      src: ['js/file1.js', 'js/file2.js'],
      dest: 'js/build.js',
    }
  }
});
Here we’re configuring the concat task, where we’re setting the option, banner, and configuring the subtask, dist, to concatenate file1.js and file2.js into one file, build.js.
Based on the plugin, configuring can be slightly different, so it’s important that you read the documentation to see what can be configured and how to configure it.
Loading plugins
Now that you’ve configured the concat task, you have to load the plugin or Grunt will not recognize the task.
grunt.loadNpmTasks('grunt-contrib-concat');
Configuring the default task
Grunt has a default task that is triggered by running the following command:
grunt
You can also run grunt default. You can configure the default task to run the command of your choice.
grunt.registerTask('default', ['concat']);
Configuring custom tasks
You can also configure custom tasks, which is done in the same manner as the default task. You’ll pass your task name in the first parameter and one-or-more tasks in the second parameter as an array.
grunt.registerTask('customtaskname', ['task1', 'task2', 'task3']);
Running tasks
Once tasks, the default task, and custom tasks have been configured, you can run them as such:
grunt
grunt concat
grunt customtaskname
If you have more than one subtask for a task, running grunt taskname will run all the subtasks in linear order. However, if you want to run a specific subtask:
grunt taskname:subtaskname
This is a great way to break up your tasks so you can run specific tasks for specific scenarios, such as development vs production.
Create a Sample Project
Now that you know the basic anatomy and setup of Grunt and its files, let’s go ahead and create a sample, working Grunt project. This sample project will cover Sass compilation and minification, JavaScript concatenation and minification, and watching for changes in your files.
Set up project files
sample-project
├── sass
├── └── screen.scss
├── src
│   ├── file1.js
├── └── file2.js
├── Gruntfile.js
├── index.html
└── package.json
package.json
json
{
  "name": "sample-project",
  "version": "0.0.1",
  "devDependencies": {
    "grunt": "~0.4.2",
    "grunt-contrib-concat": "^0.3.0",
    "grunt-contrib-uglify": "^0.4.0",
    "grunt-contrib-watch": "^0.6.1",
    "grunt-sass": "^0.12.0"
  }
}
Gruntfile.js
```js
module.exports = function(grunt) {
grunt.initConfig({
pkg: grunt.file.readJSON(‘package.json’),
concat: {
dist: {
src: [‘js/file1.js’, ‘js/file2.js’],
dest: ‘dist/build.js’,
}
},
sass: {
dist: {
files: {
‘dist/screen.css’: ‘sass/screen.scss’,
}
},
production: {
options: {
outputStyle: ‘compressed’,
},
files: {
‘dist/screen.css’: ‘sass/screen.scss’,
}
}
},
uglify: {
dist: {
src: ‘dist/build.js’,
dest: ‘dist/build.js’,
}
},
watch: {
sass: {
files: [‘sass/*/.scss’],
tasks: [‘sass:dist’],
},
scripts: {
files: [‘js/*/.js’],
tasks: [‘concat’],
}
}
});
grunt.loadNpmTasks(‘grunt-contrib-concat’);
grunt.loadNpmTasks(‘grunt-contrib-uglify’);
grunt.loadNpmTasks(‘grunt-contrib-watch’);
grunt.loadNpmTasks(‘grunt-sass’);
grunt.registerTask(‘build’, [‘concat’, ‘sass:dist’]);
grunt.registerTask(‘default’, [‘concat’, ‘sass:dist’, ‘watch’]);
grunt.registerTask(‘production’, [‘concat’, ‘uglify’, ‘sass:production’]);
};
```
index.html
```html
Sample project
**screen.scss**
```scss
body {
  background: #ccc;
}

h1 {
  color: blue;
}
file1.js
js
alert("file1.js");
file2.js
js
alert("file2.js");
Install Grunt and plugins
Now that our files are prepped and ready, we need to install Grunt and the necessary plugins so we can run tasks.
In the root directory of the project, run:
npm install
Running tasks
Now you’re ready to run the configured Grunt tasks. Open up index.html in your browser. For starters, let’s go ahead and run the custom build task:
grunt build
The custom build task was configured as follows:
grunt.registerTask('build', ['concat', 'sass:dist']);
You’ll notice that build.js and screen.css were created in a new dist directory. Refresh index.html and you should get 2 alerts and notice the styling of the page has changed.
Now let’s run the default Grunt task:
grunt
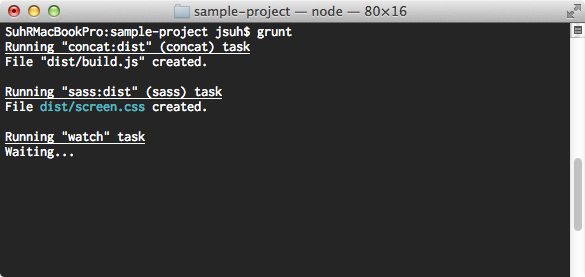
The default task was configured as follows:
grunt.registerTask('default', ['concat', 'sass:dist', 'watch']);
After running concat and sass:dist, Grunt waits and watches for changes to any files in directories js/ and sass/.
Go ahead and make changes to screen.scss and one of the JavaScript files in js/ and save your changes.
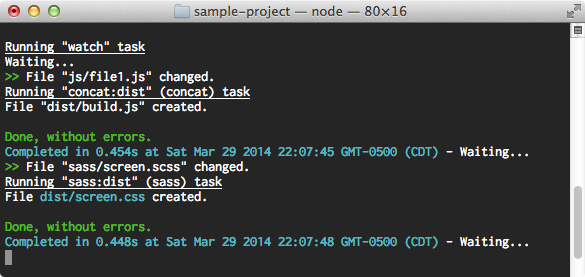
You’ll notice in Terminal that Grunt detected your changes and ran the corresponding task based on the files that were changed. Refresh index.html again and you should notice the changes you’ve made.
Let’s say you’re done with development and you’re ready to make the files production-ready. Run the custom production task:
grunt production
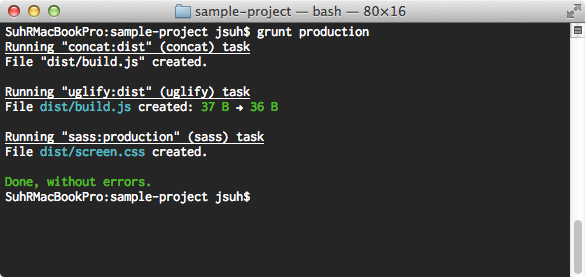
The custom production task was configured as follows:
grunt.registerTask('production', ['concat', 'uglify', 'sass:production']);
If you check the files in dist/ you’ll notice that both build.js and screen.css were compiled then minified. Notice that grunt production is calling a subtask sass:production as opposed to sass:dist, which is used for development.
You’re ready
That should be enough know-how to integrate Grunt into an existing or new project as well as experiment with other plugins out there. If you’re still a little confused, don’t hesistate to ask me on Twitter @jonsuh.
Ready to go a step further? I wrote a follow-up post that’ll help you improve and optimize your Grunt setup! Take Grunt to the Next Level